
Envoy Gateway 治理多集群服务流量
- Xunzhuo
- Envoy gateway
- September 13, 2023
Table of Contents
Envoy Gateway 在设计之初是作为南北向流量治理 API 网关。轻量级、简洁性、易扩展是 Envoy Gateway 的设计思想,Envoy Gateway 在近期支持了 ServiceImport 作为 xRoute 的 backendRefs,基于 Multi-Cluster Service (MCS) APIs 以及它的实现,如 Submariner,打平了集群之间服务的差异,在保持了 EG 架构简洁性的同时,同时能够实现多集群的服务流量治理。
本文会介绍 MCS API,以及 Submariner,同时提供一个示例去展示如何通过 Envoy Gateway 访问多集群服务。
Multi-Cluster Service APIs (MCS) 介绍
MCS 是什么?

多集群服务(Multi-Cluster Services,简称 MCS)API 是 Kubernetes 的一个新功能,旨在提供一种标准化的方法来实现跨多个 Kubernetes 集群的服务发现和通信。
MCS API 的目标是简化跨集群服务的管理和使用,使得用户可以在多个集群之间轻松地共享和访问服务。
MCS 核心概念
- ServiceExport:ServiceExport 是一个自定义资源定义(CRD),用于将一个集群中的 Kubernetes 服务导出到其他集群。当用户创建一个 ServiceExport 资源时,该服务将被标记为可跨集群访问,并在其他集群中生成相应的 ServiceImport 资源。如果多个集群导出具有相同命名空间名称的服务,它们将被识别为单个组合服务。
- ServiceImport:ServiceImport 也是一个自定义资源定义(CRD),用于表示从其他集群导入的服务。ServiceImport 资源包含了导入服务的相关信息,如服务名称、命名空间、端口等。用户可以通过查询 ServiceImport 资源来发现和访问跨集群的服务。
- ClusterSet:ClusterSet 是一组互联的 Kubernetes 集群,它们共享相同的 MCS API 配置。在一个 ClusterSet 中,集群之间可以使用 MCS API 实现服务的导出和导入。
MCS 工作原理
- 用户在一个集群中创建一个 Kubernetes 服务,并为该服务创建一个 ServiceExport 资源。
- MCS API 控制器检测到 ServiceExport 资源的创建,并将服务标记为可跨集群访问。
- 在其他集群中,MCS API 控制器自动创建相应的 ServiceImport 资源,表示从源集群导入的服务。
- 用户可以在目标集群中查询 ServiceImport 资源,发现和访问跨集群的服务。可以从 ClusterSet 内访问多集群服务的域名。域名将为
<service-export-name>.<service-export-namespace>.svc.clusterset.local,同时会有包含源集群 Endpoint 的 EndpointSlice 会被创建在目标集群中创建,并由 MCS API 控制器管理。
通过 MCS API,用户可以更轻松地实现跨多个 Kubernetes 集群的服务发现和通信。需要注意的是,MCS API 目前仍处于开发阶段,尚未成为 Kubernetes 的稳定功能。然而,许多跨集群网络项目(如 Submariner)已经开始支持 MCS API,并将其作为服务发现的标准接口。
Submariner 介绍
Submariner 是什么?
Submariner 是一个开源项目,由云原生计算基金会(CNCF SandBox)托管。它旨在解决 Kubernetes 集群之间的网络连接问题,使得不同集群之间的服务和工作负载能够相互发现和通信。Submariner 的主要目标是提供一个简单、安全、高效的方法来实现多个 Kubernetes 集群之间的网络互联。
Submariner 核心概念
Submariner 的架构设计主要包括以下几个关键组件:
- Broker
- Gateway
- Route Agent
- Globalnet
- Lighthouse
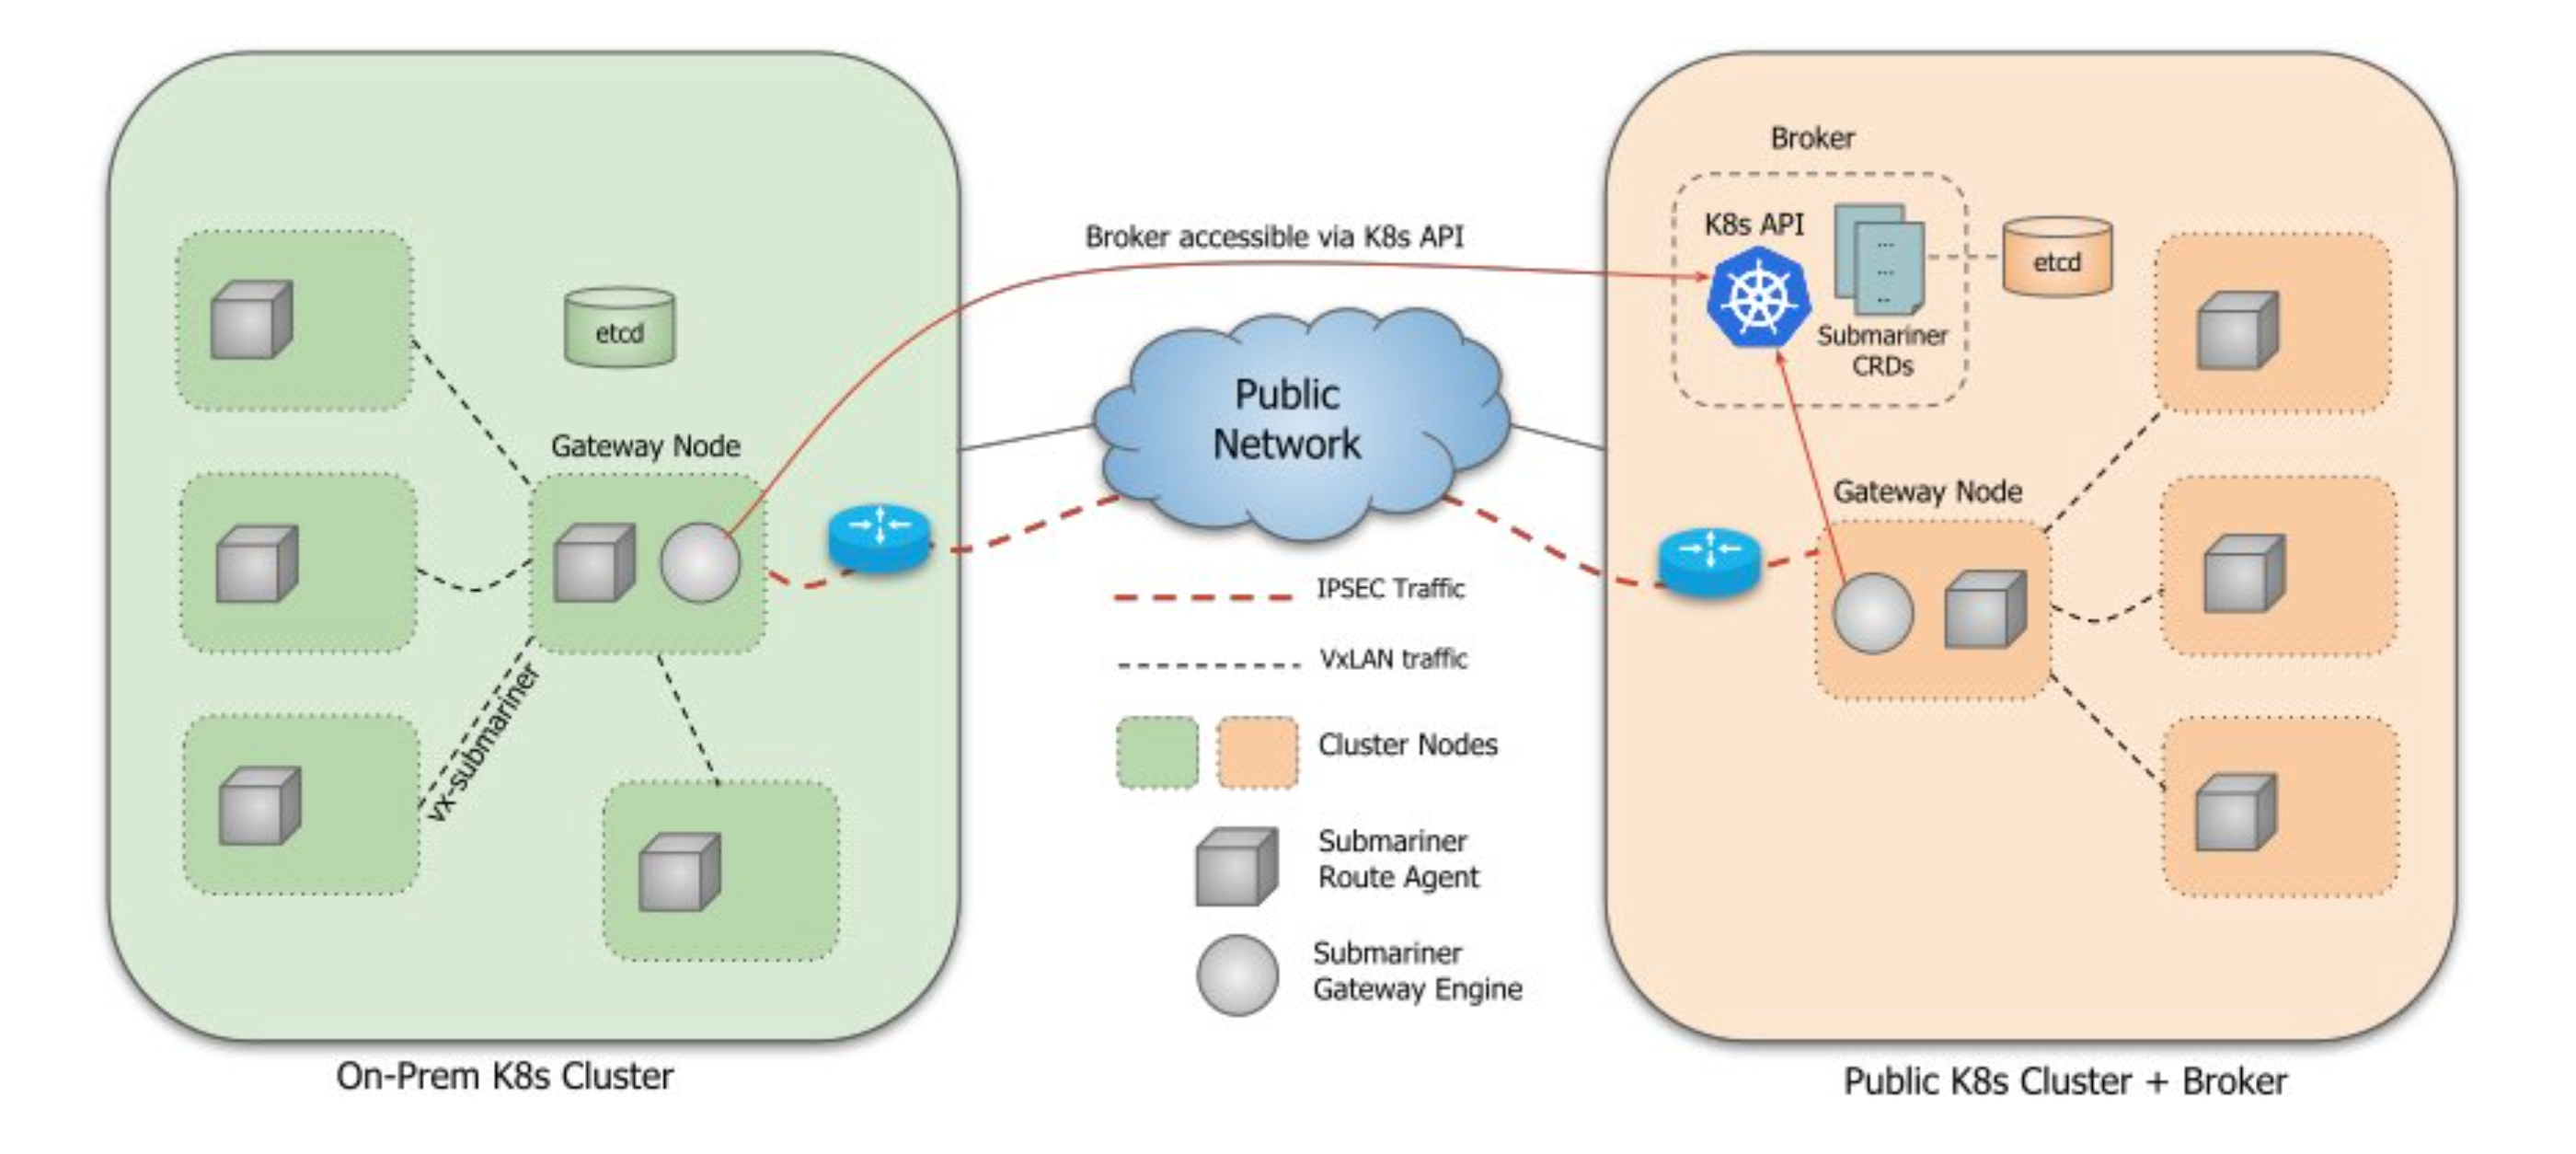
Broker
Broker 是 Submariner 的中心组件,它负责存储和同步各个集群的元数据信息。
Broker 可以部署在任何一个集群中,或者在一个独立的集群中。Broker 不参与数据平面的通信,只负责控制平面的信息交换。
Submariner 定义了两个通过 Broker 交换的 CRD:Endpoint 和 Cluster。
Endpoint CRD 包含有关集群中 Active Gateway 的信息,例如集群相互连接所需的 IP:
➜  submariner-operator git:(devel) ✗ kg endpoints.submariner.io -A
NAMESPACE             NAME                                            AGE
submariner-operator   cluster1-submariner-cable-cluster1-x-x-x-x   163m
submariner-operator   cluster2-submariner-cable-cluster2-x-x-x-x   163m

➜  submariner-operator git:(devel) ✗ kg endpoints.submariner.io cluster1-submariner-cable-cluster1-x-x-x-x -n submariner-operator -oyaml
apiVersion: submariner.io/v1
kind: Endpoint
metadata:
  creationTimestamp: "2023-09-06T04:04:05Z"
  generation: 1
  labels:
    submariner-io/clusterID: cluster1
  name: cluster1-submariner-cable-cluster1-172-18-0-4
  namespace: submariner-operator
  resourceVersion: "7039"
  uid: c2186c5d-28fd-4101-816c-ed3c5704b78e
spec:
  backend: libreswan
  backend_config:
    natt-discovery-port: "4490"
    preferred-server: "false"
    udp-port: "4500"
  cable_name: submariner-cable-cluster1-172-18-0-4
  cluster_id: cluster1
  healthCheckIP: x.x.x.x
  hostname: cluster1-control-plane
  nat_enabled: false
  private_ip: x.x.x.x
  public_ip: x.x.x.x
  subnets:
  - x.x.x.x
Cluster CRD 包含有关原始集群的静态信息,例如 CIDR 和 Cluster 信息:
➜  submariner-operator git:(devel) ✗ kg clusters.submariner.io -A
NAMESPACE             NAME       AGE
submariner-operator   cluster1   165m
submariner-operator   cluster2   165m

➜  submariner-operator git:(devel) ✗ kg clusters.submariner.io cluster1 -n submariner-operator -oyaml
apiVersion: submariner.io/v1
kind: Cluster
metadata:
  creationTimestamp: "2023-09-06T04:04:05Z"
  generation: 1
  labels:
    submariner-io/clusterID: cluster1
  name: cluster1
  namespace: submariner-operator
  resourceVersion: "7036"
  uid: eae3dde0-34e6-48ba-b27f-2cdf2c9dfa07
spec:
  cluster_cidr:
  - x.x.x.x/xx
  cluster_id: cluster1
  color_codes:
  - blue
  global_cidr:
  - x.x.x.x/xx
  service_cidr:
  - x.x.x.x/xx
Gateway
Gateway 是 Submariner 的数据平面组件,它负责在集群之间建立和维护安全的网络通道。每个集群中都需要部署一个或多个 Gateway。
Gateway 具有用于维护隧道的引擎组件的可插拔架构。可以使用以下实现:
可以在使用 subctl join 时指定 --cable-driver 选择对应的 driver。
Active Gateway 与 Broker 进行通信,向连接到的其他集群通知其 Endpoint 和 Cluster 资源,同时确保它是其集群的唯一 Endpoint。集群中运行的 Route Agent 会通过解析本地 Endpoint CR,并建立必要的基础设施,将所有节点的跨集群流量路由到 Active Gateway 的节点。Active Gateway 也会 Watch Broker,以获取其他集群的 Endpoint 和 Cluster 资源。一旦两个集群知道了彼此的 Endpoint,它们就可以建立一个安全隧道,通过该隧道传输流量。
Route Agent
Route Agent 负责在集群内部配置网络路由,以确保 Pod 和服务的流量可以正确地路由到 Gateway。
他在每个集群的每个节点上运行,负责在现有的 Kubernetes CNI 插件之上设置必要的主机网络信息。
对于在 iptables 模式下使用 kube-proxy 的 CNI 插件,Route Agent 负责设置 VXLAN 隧道并将跨集群流量从节点路由到集群的 Gateway,随后 Gateway 将流量发送到目标集群。
对于 OVN 的 Kubernetes CNI 插件,在所有节点上配置主机网络路由,并且在 Gateway 节点上,在 ovn-k8s-gw0 和电缆接口之间配置 IP 转发。
**Lighthouse (Service-Discovery) **
Lighthouse 是 Submariner 的服务发现组件,它负责实现跨集群的服务发现,实现了 MCS API。

Lighthouse Agent
Lighthouse Agent 运行在每个集群中,并访问 Broker 集群中运行的 Kubernetes APIServer,与其他集群交换服务元数据信息。将本地 Service 信息导出到 Broker,导入其他集群的 Service 信息。
工作流:
- Lighthouse Agent 连接到 Broker 的 Kubernetes API Server。
- 对于本地集群中已创建 ServiceExport 的每个 Service,Agent 都会创建 ServiceImport 和 EndpointSlice 资源,并将它们导出到 Broker 以供其他集群使用。
- 对于从另一个集群导出的 Broker 中的每个资源,它都会在本地集群中创建一个副本。
Lighthouse DNS Server
Lighthouse DNS 服务器作为拥有域 clusterset.local 的外部 DNS 服务器运行。 CoreDNS 配置为将发送到 clusterset.local 的任何请求转发到 Lighthouse DNS 服务器,它使用控制器分配的 ServiceImport 和 EndpointSlice 资源来构建用于 DNS 解析的地址缓存。 Lighthouse DNS 服务器支持使用 A 记录和 SRV 记录进行查询。
当单个 Service 部署到多个集群时,Lighthouse DNS Server 首先优先选择本地集群,然后以循环方式将流量路由到其他远程集群。
工作流:
- Pod 尝试使用域名 clusterset.local 解析服务名称。
- CoreDNS 将请求转发到 Lighthouse DNS Server。
- Lighthouse DNS Server 将使用其地址缓存来尝试解析该请求。
- 如果记录存在,则将返回该记录,否则将返回 NXDomain 错误。
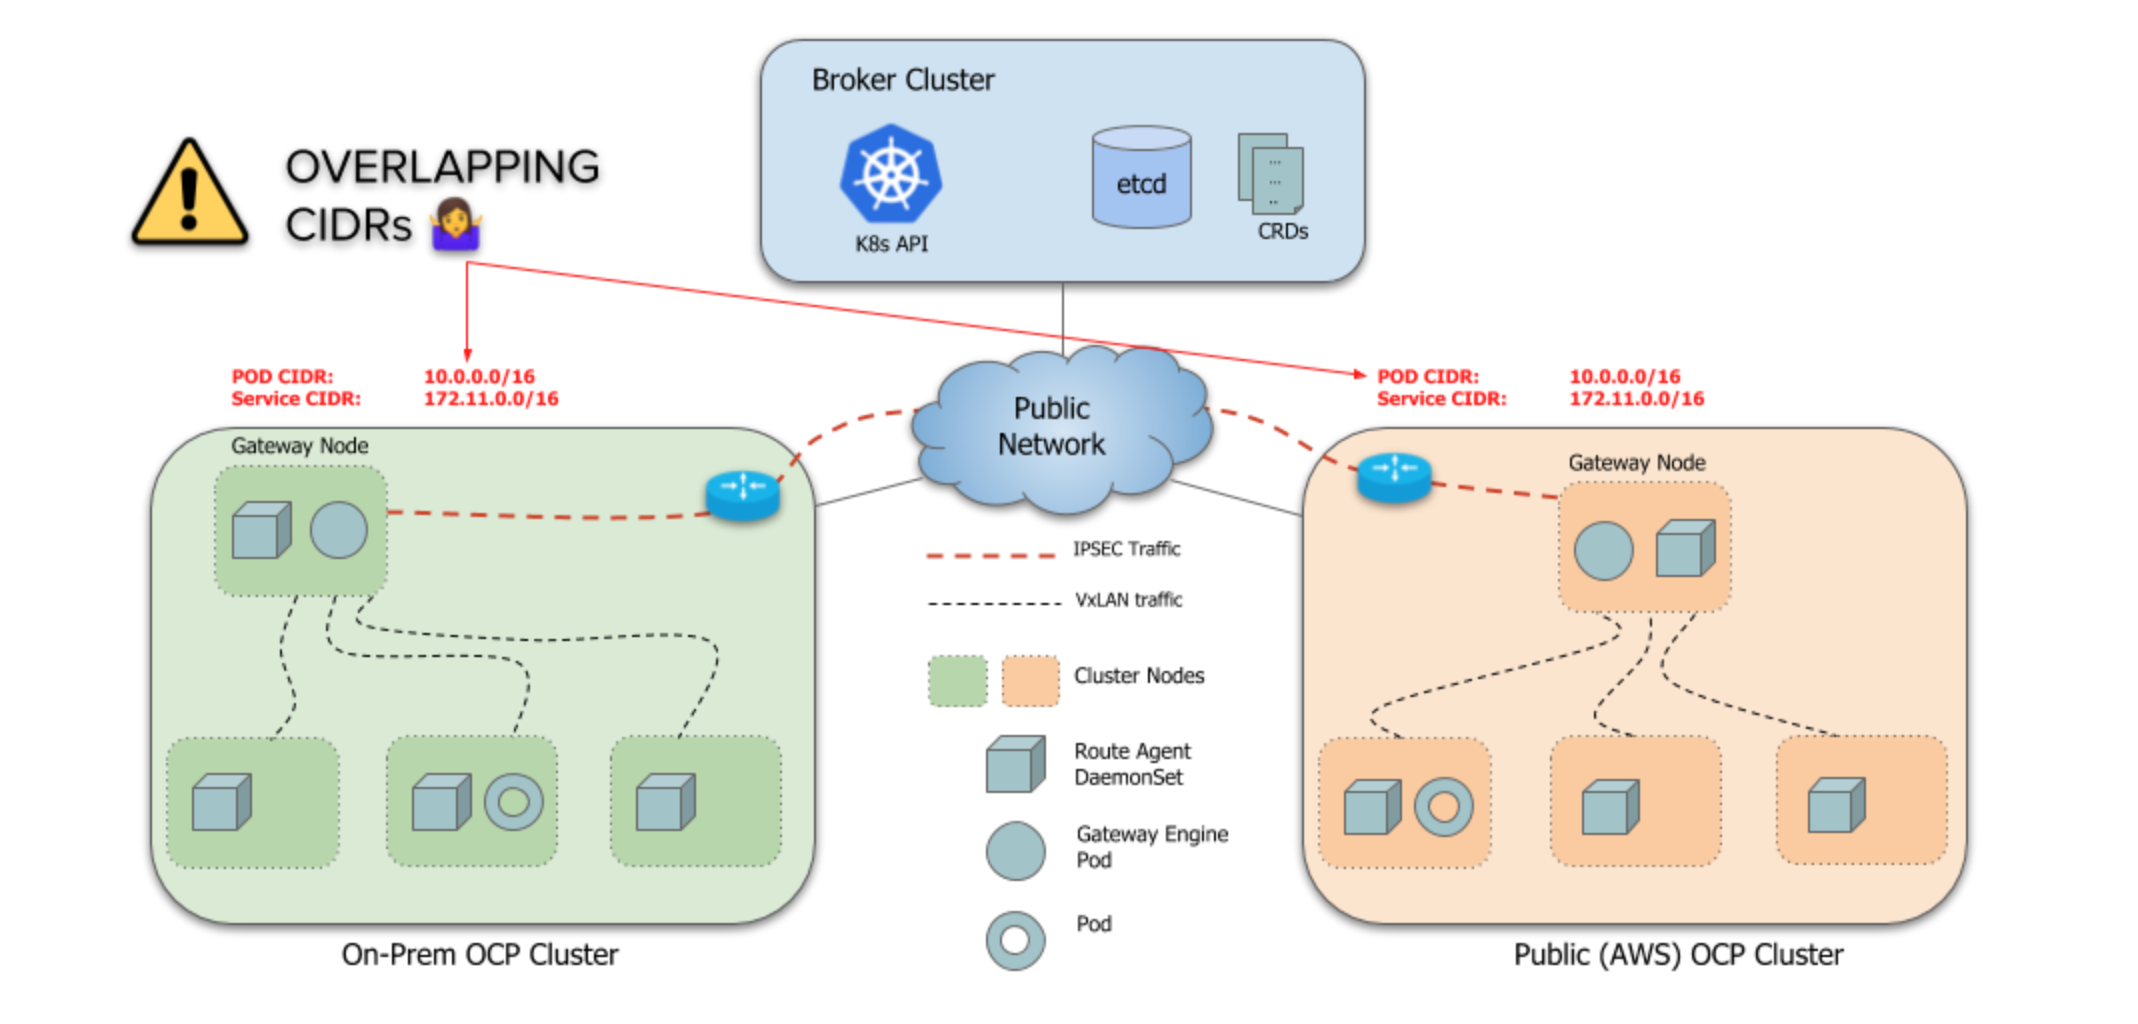
Globalnet
Globalnet 是一个可选组件,它负责在集群之间实现 IP 地址管理和 NAT(网络地址转换)。
默认情况下,Submariner 的一个限制是它不处理跨集群的重叠 CIDR(ServiceCIDR 和 ClusterCIDR)。每个集群必须使用不同的 CIDR,这些 CIDR 不会与将成为 ClusterSet 一部分的任何其他集群发生冲突或重叠。当集群的 Pod 和服务 IP 地址范围有冲突时,可以启用 Globalnet。
示例
以下我们通过一个示例,来展示通过 Envoy Gateway 访问跨集群服务。
环境准备
设置 KIND 集群并安装 Submariner
- 我们将使用 KIND 集群来演示此示例:
git clone https://github.com/submariner-io/submariner-operator
cd submariner-operator
make clusters
注意:保留在 submarar-operator 目录中执行本节中的其余步骤。
待步骤结束,会得到两个集群 cluster1,cluster2:
➜  submariner-operator git:(devel) ✗ kind get clusters
cluster1
cluster2
➜  submariner-operator git:(devel) ✗ kind get nodes -A
cluster1-worker
cluster1-control-plane
cluster2-worker
cluster2-control-plane
- 安装
subctl:
curl -Ls https://get.submariner.io | VERSION=v0.14.6 bash
请使用 v0.14.6 版本的 subctl
- 为跨集群流量设置 MCS API 和 Submarer:
subctl deploy-broker --kubeconfig output/kubeconfigs/kind-config-cluster1 --globalnet
subctl join --kubeconfig output/kubeconfigs/kind-config-cluster1 broker-info.subm --clusterid cluster1 --natt=false
subctl join --kubeconfig output/kubeconfigs/kind-config-cluster2 broker-info.subm --clusterid cluster2 --natt=false
完成上述步骤后,两个集群中的所有 pod 均已启动。我们已准备好安装 Envoy Gateway。
安装 Envoy Gateway
在 cluster1 中安装 Gateway API CRD 和 Envoy Gateway:
helm install eg oci://docker.io/envoyproxy/gateway-helm --version v0.0.0-latest -n envoy-gateway-system --create-namespace --kubeconfig output/kubeconfigs/kind-config-cluster1
等待 Envoy Gateway Ready:
kubectl wait --timeout=5m -n envoy-gateway-system deployment/envoy-gateway --for=condition=Available --kubeconfig output/kubeconfigs/kind-config-cluster1
安装 Demo 服务
在 cluster2 中安装后端应用程序并通过 subctl 命令导出:
kubectl apply -f https://raw.githubusercontent.com/envoyproxy/gateway/latest/examples/kubernetes/application.yaml --kubeconfig output/kubeconfigs/kind-config-cluster2
subctl export service backend --namespace default --kubeconfig output/kubeconfigs/kind-config-cluster2
创建 Gateway API 对象
在 cluster1 中创建 Gateway API 对象 GatewayClass、Gateway 和 HTTPRoute 以设置路由。
kubectl apply -f https://raw.githubusercontent.com/envoyproxy/gateway/latest/examples/kubernetes/multicluster-service.yaml --kubeconfig output/kubeconfigs/kind-config-cluster1
看一下具体配置内容,可以看到路有规则中,可以直接使用 ServiceImport 作为后端服务,已访问跨集群服务:
apiVersion: gateway.envoyproxy.io/v1alpha1
kind: EnvoyProxy
metadata:
  name: custom-proxy-config
  namespace: envoy-gateway-system
spec:
  provider:
    kubernetes:
      envoyService:
        type: ClusterIP
    type: Kubernetes
---
apiVersion: gateway.networking.k8s.io/v1
kind: GatewayClass
metadata:
  name: eg
spec:
  controllerName: gateway.envoyproxy.io/gatewayclass-controller
  parametersRef:
    group: gateway.envoyproxy.io
    kind: EnvoyProxy
    name: custom-proxy-config
    namespace: envoy-gateway-system
---
apiVersion: gateway.networking.k8s.io/v1
kind: Gateway
metadata:
  name: eg
  namespace: default
spec:
  gatewayClassName: eg
  listeners:
    - name: http
      protocol: HTTP
      port: 80
---
apiVersion: gateway.networking.k8s.io/v1
kind: HTTPRoute
metadata:
  name: backend
  namespace: default
spec:
  parentRefs:
    - name: eg
  hostnames:
    - "www.example.com"
  rules:
    - backendRefs:
        - group: multicluster.x-k8s.io
          kind: ServiceImport
          name: backend-default-cluster2
          namespace: submariner-operator
          port: 3000
      matches:
        - path:
            type: PathPrefix
            value: /
---
apiVersion: gateway.networking.k8s.io/v1beta1
kind: ReferenceGrant
metadata:
  namespace: submariner-operator
  name: referencegrant-1
spec:
  from:
    - group: gateway.networking.k8s.io
      kind: HTTPRoute
      namespace: default
  to:
    - group: multicluster.x-k8s.io
      kind: ServiceImport
测试
获取示例网关创建的 EnvoyProxy Service 的名称:
export ENVOY_SERVICE=$(kubectl get svc -n envoy-gateway-system --selector=gateway.envoyproxy.io/owning-gateway-namespace=default,gateway.envoyproxy.io/owning-gateway-name=eg -o jsonpath='{.items[0].metadata.name}')
端口转发到 EnvoyProxy Service:
kubectl -n envoy-gateway-system port-forward service/${ENVOY_SERVICE} 8888:80 &
通过 Envoy Proxy, Curl 示例应用程序:
curl --verbose --header "Host: www.example.com" http://localhost:8888/get

*   Trying ::1...
* TCP_NODELAY set
* Connected to localhost (::1) port 8888 (#0)
> GET /get HTTP/1.1
> Host: www.example.com
> User-Agent: curl/7.61.1
> Accept: */*
>
Handling connection for 8888
< HTTP/1.1 200 OK
< content-type: application/json
< x-content-type-options: nosniff
< date: Wed, 06 Sep 2023 07:32:41 GMT
< content-length: 510
< x-envoy-upstream-service-time: 0
< server: envoy
<
{
 "path": "/get",
 "host": "www.example.com",
 "method": "GET",
 "proto": "HTTP/1.1",
 "headers": {
  "Accept": [
   "*/*"
  ],
  "User-Agent": [
   "curl/7.61.1"
  ],
  "X-Envoy-Expected-Rq-Timeout-Ms": [
   "15000"
  ],
  "X-Envoy-Internal": [
   "true"
  ],
  "X-Forwarded-For": [
   "x.x.x.xs"
  ],
  "X-Forwarded-Proto": [
   "http"
  ],
  "X-Request-Id": [
   "0713060f-95e5-4b56-ac44-55411cda1380"
  ]
 },
 "namespace": "default",
 "ingress": "",
 "service": "",
 "pod": "backend-74888f465f-jfbgj"
* Connection #0 to host localhost left intact
}#
至此,我们已经通过 cluster1 的 Envoy Gateway,访问到了 cluster2 的服务。